Monday, July 23, 2018

Guest Designer Kim Huffman


Hello there!  I was given "Slay" to work with this month, an incredible honor as I am a big fan of "Slayverse".   The first thing I had to do was pay homage to a favorite snow scene.  I started with ink blending with Distress Oxide inks on white cardstock to get the perfect shades of night sky and grass.


Once those were the desired colors, I used my Cricut to size and cut a simple cityscape in black and yellow cardstocks for the background, to emulate a city far off.


I stamped out the characters for this card using MFT's Extreme Black ink because I wanted to so some simple coloring with my Spectrum Noir alcohol markers.  Although I enjoy coloring, I am not very good at it - I stick to simple 2-3 color blends.


I fussy cut the little characters after they were colored, then assembled them into my shaker.


I covered the underside of the frame with some acetate and built the foam layer with just one layer of foam tape because snow glitter is tiny (and messy!) and it doesn't need a lot of space.  My last step was to brush a little Zig glue onto the characters in small spots and waited for it to almost dry - so some of the "snow" would stick to their bodies, too.

And that's it!  I hope you have enjoyed my interpretation of this iconic scene using the amazing new set "Slay" from Kindred Stamps!  Thanks so much for your support, I've had a blast this month!


The Kindred Stamps team, myself included, hope that you've enjoyed reading about my card makes for this release. If you would like an opportunity to win shop credit please go and comment on everyone's blog post! One random winner will win a $10 shop credit, they will be contacted privately and announced in our Fan Club, Kindred Stamps Fan Club!

Kindred Stamps
Guest Designer Kim Huffman
Tinkerin in Ink

Monday, May 21, 2018

Multi Media crafting with Kindred Stamps by Heather Collins

Designer Heather Collins has always LOVED space!  At one time she wanted to be an astronaut. The problem was that math and science weren’t really my strong suits when it came to school.  But I had a wild imagination and a mad LOVE of ALL things SCI-FI. As a child my whole family would watch whatever space theme tv shows we could find on tv.   My Dad and I would even sneak away and watch the movies. So when Kindred Stamps came out with ‘The Next Space Explorer’ stamp set I was thrilled. Though my daughter did try to steal the set when she saw it too.  I have continued the tradition of watching SCI-FI with my family too.


To begin, I placed the stamps in my Misti and, using Brutus Monroe’s Raven Detail ink, I   stamped out all of the characters. Then, using my zig markers and a water brush, I colored in each of the characters.   I used Nuvo Glitter, Clear and Red accents where I felt they were needed. The Glitter and Clear will lift any color that it is placed on top of. For the ‘Body Guard’ character on top of the clear Nuvo I sprinkled crushed silver glass glitter.  I fussy cut out each of the characters so they could stand on their own feet.

For the ship, I printed it out and colored the same with the the zigs, water brush and added a silver metallic marker.  I added the Nuvo Glitter and Red accents too where I felt there would be a light effect.

The canvas and half a sphere I coated with white gesso and sprinkled with ultra fine glitter.   I made some patterns on the sphere. On the canvas I sprayed Brutus Monroe’s ‘Cornflower, Oz, Suede. Sidewalk and Phonebook’ Surface Sprays.  Again I coated with the ultra fine glitter. Spray with water and make sure that the sides are covered also. I used a heat gun to speed up the drying process. I splattered with gloss white enamel paint when it was dry.   Lastly, I added crystal gems on the canvas.

Taking the half styrofoam sphere I applied Prima Marketing Art Extravagance -Stone Effect Paste (Pumice, Limestone, Concrete).    The first thing you want to do is open them all up and line them up in order of thickness. I applied the concrete first then surrounded on both sides with limestone and lastly pumice.  I wanted the planet to look like it had a crater on top and then a wavy pattern in the middle circling the whole thing. I brushed on some leftovers on the bottom and a gap so that it didn’t look like it was too smooth.  After it was dry, I sprayed Brutus Monroe ‘Sidewalk’ Surface Spray on top. Then took Brutus Monroe Color Burst and sprites on the globe and sprayed with water. To get the darker look I mixed some ‘Marsala’ and ‘Jack O Lantern’ in a little container and applied with a foam brush.


After everything was dried the assembly started.  The ship was mounted on a straw on a wire frame and attached to the back of the canvas with tape.  The sphere has a double layer of foam squares on the back and is attached at an angle onto the canvas.   Two of the characters I put on wooden kitchen skewers so they can be moved. The other characters were mounted on foam squares and just attached to the planet.

Supply list:

-’The Next Space Explorer’ set along with the Digi set too
-Misti
-Canvas
-wire form
-Styrofoam half sphere
-water/water bottle
-foam square adhesive
-tape
-kitchen wooden skewers
-Brutus Monroe Raven Detail Ink
-Brutus Monroe Color Burst
-Brutus Monroe Surface Sprays
-water brush
-Zig Markers
-Nuvo Glitter, Clear and Red accents
-Prima Marketing Art Extravagance -Stone Effect Paste (Pumice, Limestone, Concrete)
-Crushed Glass Silver Glitter
-Ultra fine glitter
-Gloss White Enamel paint
-Crystal gems
-Silver Metallic Marker
-Scissors
-white gesso
-Big Shot
-Heat Gun

We are extremely excited about this month's Kindred Stamps release, and want to invite you to join us on our Facebook event so you can see all of the projects our Creative and Design Teams made to showcase these fun sets! If you take the time to hop along with our team, make sure you leave a comment on each blog to be entered to win a $10 store credit!

Kindred Stamps 
Mad Crafter's Tea Party
The Frolicking Fairy
Wunders Crafty World
DaggDesigns Blog
Amy Hurley Purdie
R. Winn Creates
Heather Collins - Guest Designer (You Are Here!)
Fanciful Spaces
Crafting Love

You can also join our Fan Club on Facebook to show off your own projects an see more from our teams throughout the month! We will announce our blog hop winner there, sometime on Saturday the 26th! (In addition to messaging them privately.) 


Monday, March 12, 2018

Inseparable Friends - Kindred Stamps

Hello friends and crafters! :)

I am SO excited to be guest designing for Kindred Stamps this month! I can't wait to share my creations with all of you. 

If you know me, you probably know that animals and critters are my soft spot.  Growing up, I would watch animal related movies on daily basis. Dogs, cats, bears, deer, pigs - you name it! They have always been my favorite. Therefore, creating with the new "Inseparable Friends" stamp set brought me many joys and memories.

I think it's always a great idea to stamp the same image several times to practice your shading and coloring. However, why not turn them into cards?! For my first project, I heat embossed my doggie and fox repeteadly on a piece of watercolor paper. Added some watercoloring and  heat embossed a sentiment on a strip of vellum. I didn't want the eyes of my critters to be white, so I added black Nuvo drops to accent them. I also used white Nuvo drops and some white confetti to finish up my card. 


I did the same process for my second card but, rather than using realistic shades, I went for a rainbow effect. To be honest, I had just purchased a new watercolor set and I wanted to see how the paints would blend. I didn't initially plan on turning this into a card, but I figured my little sister would enjoy receiving this one! My colors were inspired by the Cute Confections shaker pack from Kindred Stamps. Such a beautiful sequin mix!

Here's a link to the shaker pack: https://www.kindredstamps.com/collections/shaker-packs/products/cute-confections-shaker-pack


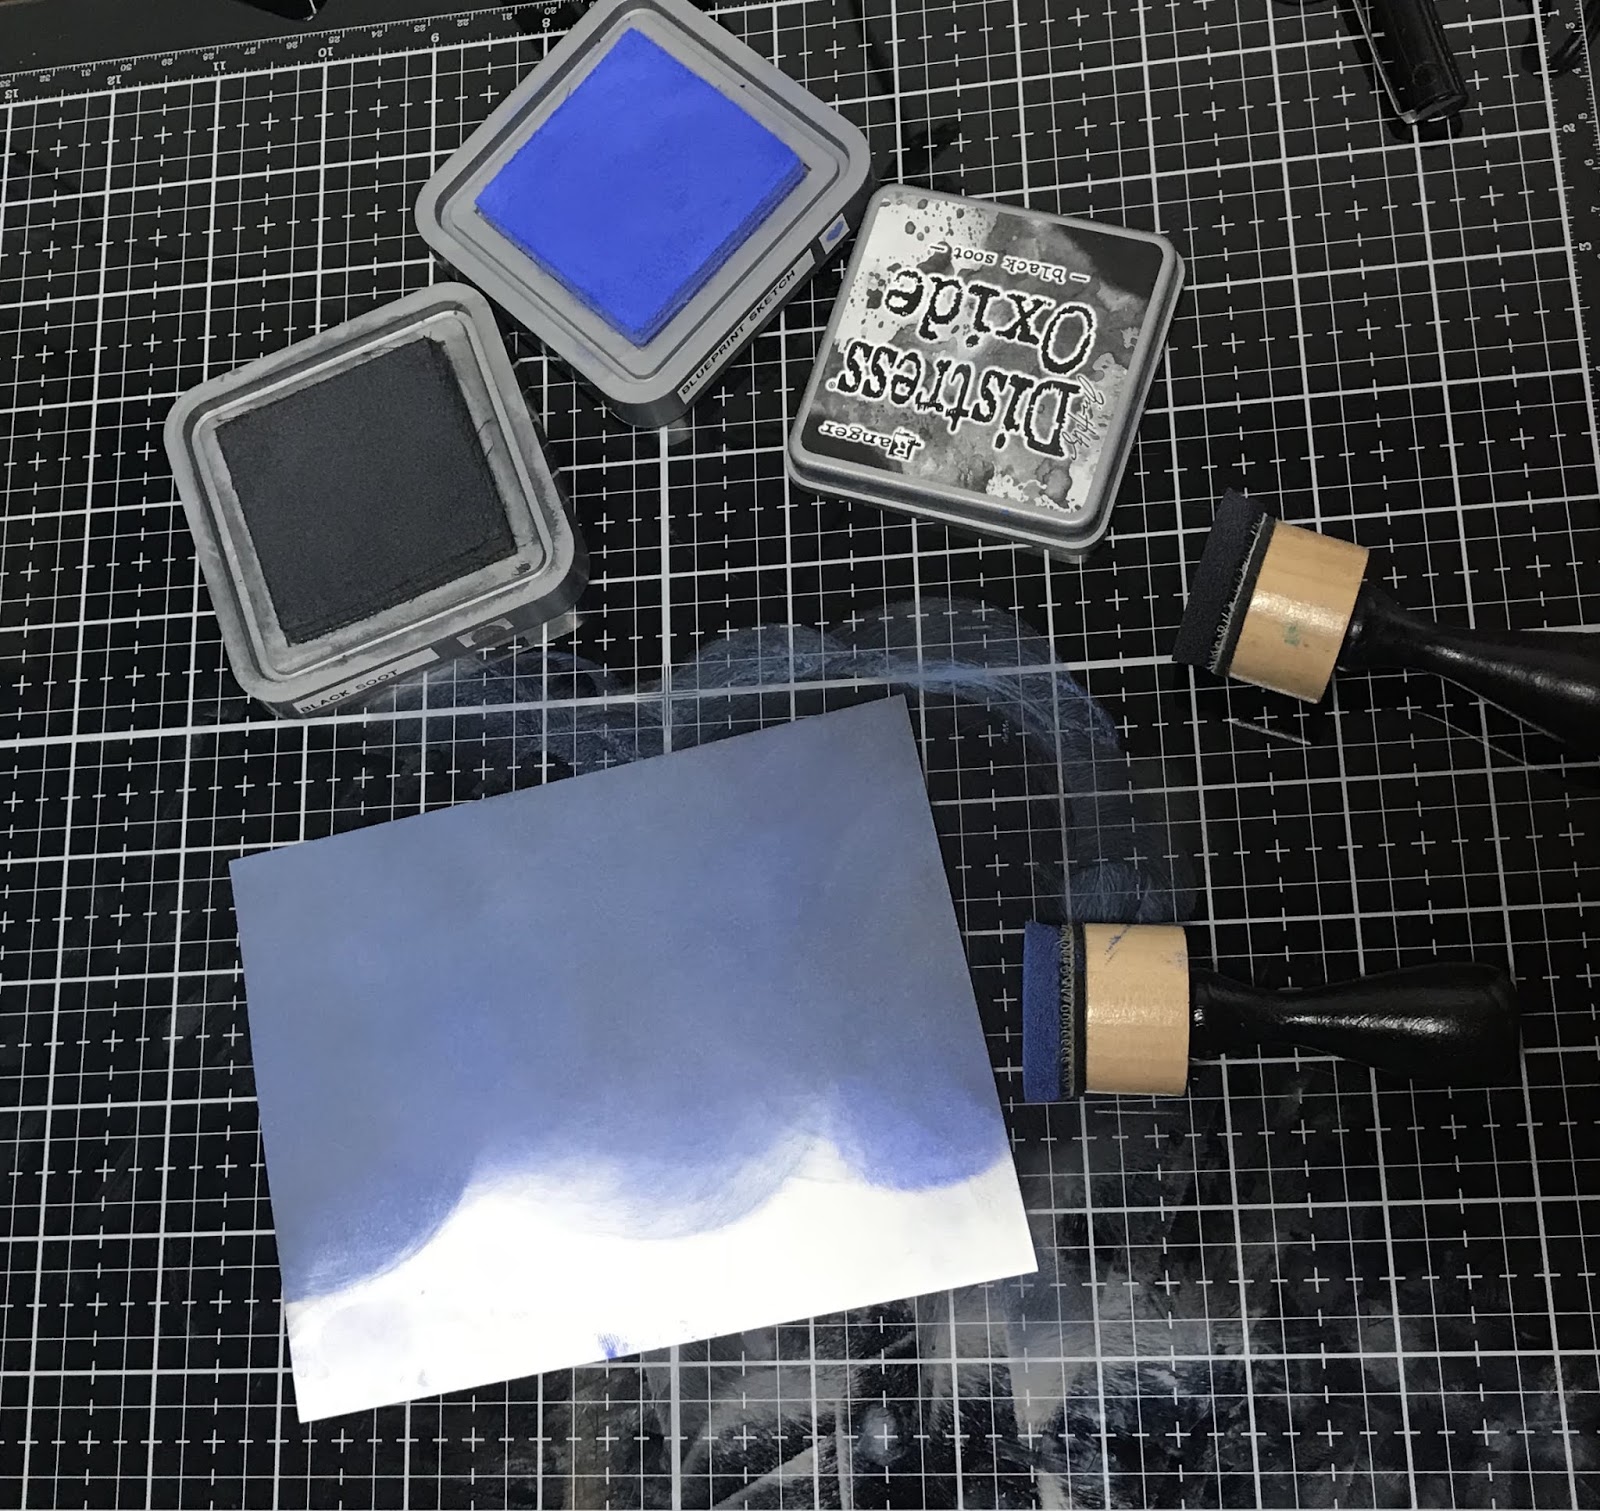
Back to a more realistic coloring! My third card involved masking, ink blending, die cutting and creating texture with a score board. I started out by stamping my two animals. The dog was stamped first and then masked. I did also create a mask for the fox, so that I could ink blend over the images. I used Candied Apple and Peeled Paint Distress Oxides on this card. If you look closely, you can tell there is a bit of texture going on. We all know that Distress inks react with water, but I actually used a paint brush direct to paper to create the effect (rather than splattering).

These little guys remind me of a farm and the fun of playing outdoors. I felt like I needed to incorporate that, so I colored a "wood grain" texture for my sentiment strip. The idea was to create sort of a barn look. Lastly, the background, which is nothing more than a piece of regular white cardstock with scored lines. Fun and easy!

I will be back in the near future to share some techniques used on this card.


My final (and favorite!) card features a spinning mechanism. I knew I wanted to create a circle card when I saw the sentiment that reads "We are inseparable". A circle is a no-ending shape, and by that I mean that there's no start and no finish. I also happened to have the perfect die to create the spinning channel. That way, no matter where they go, they always end up together!


And that's it! Thank you everyone for stopping by and for hopping along with us. I am very thankful for the opportunity to be sharing my work with you!


Now, you get to go visit my friends on the Kindred Stamps March Release Blog Hop! We have 7 stunning sets for you to enjoy this month and believe me, several are on MY wish list. I can't wait to hear which you love and must have. Make sure you leave a comment on each blog to be entered into the drawing for a $10 Kindred Stamps store credit! When you leave a comment, please also include your email address so as to find you easier, you can do so in a email (at) address dot com format if you prefer! The winner will be messaged and announced in our Facebook Fan Club!

Good Luck, and ENJOY!

Kindred Stamps 

Perky Penny Paper Arts  

Mad Crafter's Tea Party

Milene Tiberius (You are HERE!)

R Winn Creates

Clown Mom Creations

Scrappy Boy

Dagg Designs Blog

The Frolicking Fairy 

Fanciful Spaces


Wednesday, November 15, 2017

80s Girl by Amy Moser

I am so excited to be designing for Kindred Stamps this month! I'm Amy Moser, I'm a Guest Designer for Kindred Stamps, you can read more about me here!

I was assigned the stamp set "80's girl". In the words of Chandler from Friends, Could this stamp set be any cuter???? It brings up so many memories of my childhood.

I was inspired to create a strawberry house and a rainbow card for these gorgeous images.

The strawberry card was created from a 6x10 card base of real red card stock. I sketched the shape free-hand and then cut it out.  I then folded it in half and ran it through the Big Shot Machine with the Swiss Dot embossing folder. A strawberry is not a strawberry without seeds!


The rest of the house is made up of various Stampin Up punches. The Strawberry girl was coloured in with Zig Markers on Canson XL Watercolour paper and cut out.


The rainbow card was created from a 4.25x11 Whisper White card stock base and a 4x5.25 piece of the same colour which was embossed using a cloud folder and sponged with soft sky ink to make it pop. The rainbow was created using Gina Marie stitched circle dies in rainbow colours, adhered to each other and cut in half to create two rainbow pieces. the clouds were punched out of Whisper White with the Stampin Up cupcake punch. The Rainbow girl was coloured in with Zig Markers on Canson XL Watercolour paper and cut out. I heat embossed the greeting in white embossing powder and voila, rainbow card!


I loved creating with this set and I hope you will too! 

We are really excited about this release! We have 9 new sets being released on Friday! 9! Can you believe it! We are reaching back into your childhood hardcore this month, and we're giving a brief nod to one of our most vocal Supreme Court Justices! And we want to know which is your favorite set of this release. Are you Old School, like our 80s Girl set? Are you Retro, with our Strange Friends set? Or are you Pop Culture with our Annoyed Boss set? What will you be snagging on Friday?

One lucky person will win a $10 credit to the shop! Will that be you?

All you have to do, in order to win, is to visit the following blogs and comment on the posts! Easy Peasy!

Kindred Stamps

R Winn Creates


Arcade Friends, Candy Man, and It's Good To Be Bad Stamp Sets

Molly here, one of the Creative Design Team Members of Kindred Stamps!

For this blog post I used 3 different Kindred Stamp sets and made 1-2 cards from each: Arcade Friends, Candy Man, and It’s Good To Be Bad.


The first card I made was with the Arcade Friends stamp set but I wanted to try something new so I decided to make a “shaker” card. For anyone who doesn’t know, a shaker card is a card that has an empty cavity in the middle filled with small sequins and beads or clay decorations and a clear front, giving an almost snow-globe-like effect when the card is shaken.


I began with a purple card base and bordered it with 3M double sided foam tape to separate the top and bottom layer. After this, I filled the inside with the ‘Sweet And Sour Shaker Pack’ from Kindred Stamps. To create the top clear layer, I used a plastic acetate sheet and bordered it with blue paper. The next step was to put stamps on the outside as accents. From the Arcade Friends set, I picked my favorite stamps, colored them in, and used my Brother Scan And Cut to cut them out and placed around the edge.

My next card also used the Arcade Friends set, this time going back to a more traditional card. I used a blue base and covered the front with candy themed wrapping paper. I also used candy foam stickers to give depth and decorations to the front of the card.

The 3rd card came from the ‘Candy Man’ set. I picked yellow paper for the backing and decided a striped, colorful card stock that reminded me of candy canes would make a good accent layer. From there, I put the Candy Man and one of his treats, colored them in with Copic markers, and placed onto the front of the card using foam Dimensionals.

My last card came from the ‘It’s Good To Be Bad’ set, one of my favorites. I went for a underwater theme, picking neon-sea plant accent paper over an orange base card. After adding a sentiment, I took the Sea Witch stamp, colored it in, and put it on the front of the card. To give the Sea Witch a bit of extra emphasis I used a foam dimensional to raise her off the card back. We are really excited about this release! We have 9 new sets being released on Friday! 9! Can you believe it! We are reaching back into your childhood hardcore this month, and we're giving a brief nod to one of our most vocal Supreme Court Justices! And we want to know which is your favorite set of this release. Are you Old School, like our 80s Girl Set? Are you Retro, with our Strange Friends set? Or are you Pop Culture with our Annoyed Boss set? What will you be snagging on Friday? One lucky person will win a $10 credit to the shop! Will that be you? All you have to do, in order to win, is to visit the following blogs and comment on the posts! Easy Peasy!

Guest Designer Kim Huffman

Hello there!  I was given "Slay" to work with this month, an incredible honor as I am a big fan of "Slayverse".   The ...